Want to transfer large files at 125MB/s, more than doubling the average USB and wireless connection speed, and with no risk of the transfer being interrupted?
There are multiple options for transferring files between PCs or Laptops, and your first instinct may be to turn to your USB memory stick or wireless network. But if you need to transfer files quickly and efficiently, and the two machines are in the same vicinity, by far the fastest method is the trusty old Ethernet cable.
– Transfer files up to the speed of 125MB/s
– At least 1GB of file transfer in 10 seconds
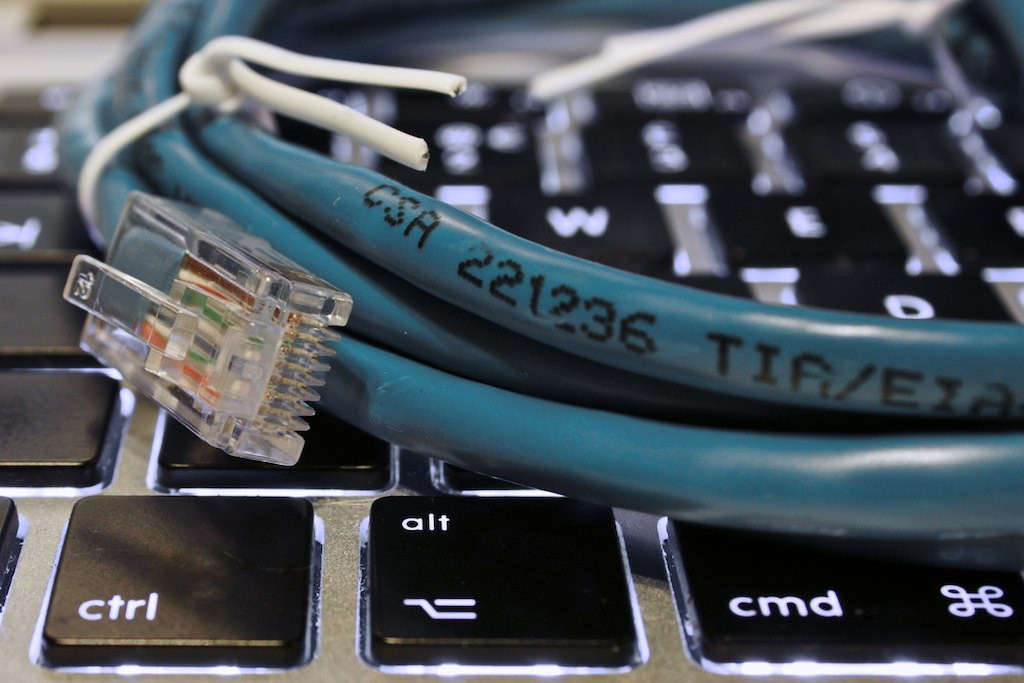
Ethernet cables (or LAN cables) are primarily used for wiring up local networks and connecting PCs to routers for wired internet access. This makes them ideal for file transfers.
A standard Cat5e cable is able to transfer data at a speed of 1,000 Megabits per second, which converts to 125 megabytes per second. That’s over 1GB in 10 seconds, so even the largest movie files or library of mp3s can be transferred within just a minute!
Don’t miss: How to Transfer files From PC to Mac via Ethernet cable
This is at least twice that of the best USB 2.0 speeds (60 megabytes per second), and the average wireless connection speed (54 megabytes per second).
Here’s how to set up your Ethernet cable for super fast file sharing:
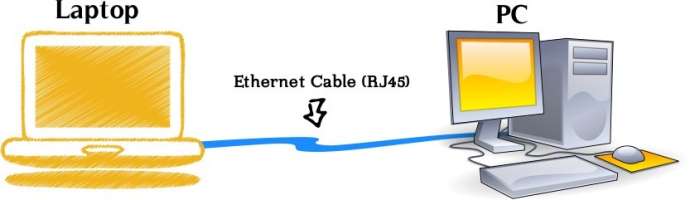
Step 1: Link the two PCs with the Ethernet Cable
Ethernet cables can be picked up for just a couple of dollars, or you probably have it lying around your room. You will need a crossover Ethernet cable to connect two computers together.
To get started slot one end of the cable in to the first computer and then slot the other end in to the second computer. Each end of the cable and each port are identical.
Step 2: Turn Off Password On PC 1
If you just want to quickly transfer files between your own two PCs, there’s no need to mess around with passwords and security.
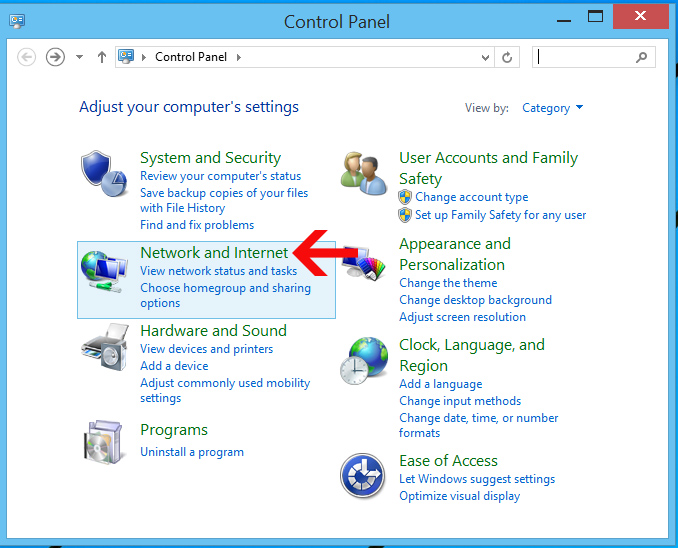
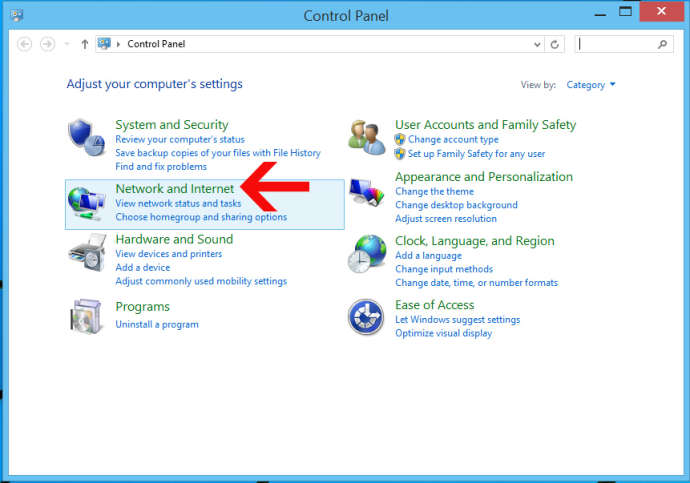
On the PC with the files you want to share (PC 1), open the Network and Sharing Center from the system tray, or from within Control Panel, and then go to Change Advanced Sharing Settings.

Scroll to the bottom of the options and check Turn off password protected sharing.
Step 3: Create IP Address

Go back to the main Network and Sharing Center window and there should be an option that says either Local Area Connection or Ethernet. Click this and then open Properties in the new window.
From here select Internet Protocol Version 4 and click Properties.

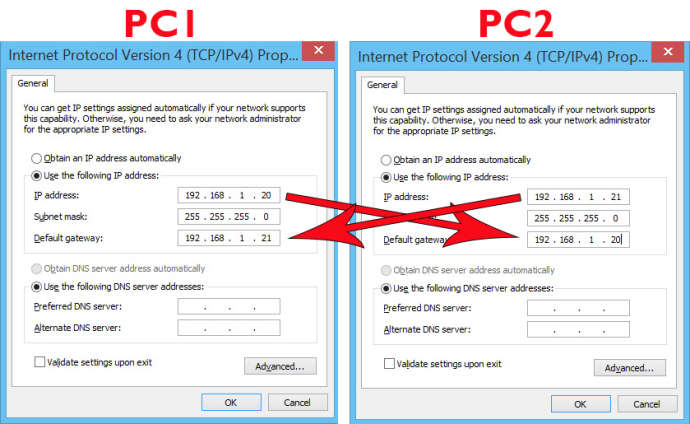
You now need to set your own IP Address so PC 2 can recognize it. This isn’t the IP Address of the computer, your internet connection, or anything else. You can literally making it up. In our example, we use 192.168.1.20 and this should work for you as well. The Subnet mask will fill automatically.

In Default gateway re-enter the IP Address, but change the final digit to 1, so it reads 192.168.1.21
Repeat this process for PC 2, but in the IP Address field enter the Default gateway from PC 1, and in Default gateway enter the IP Address from PC 1.
This is what you should end up with:
Step 4: Share Your Folder
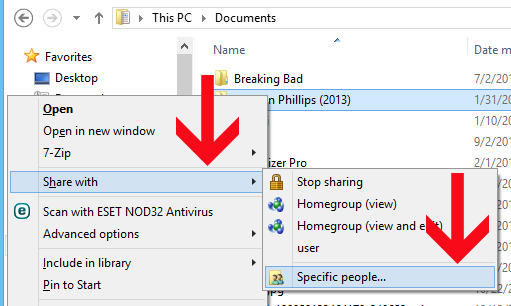
On PC 1 browse to the single file or folder containing the files you want to transfer. Right click and select Share With and Specific People.
From the drop down menu, select Everyone and click Add. Then click the downward facing arrow next to Read and change it to Read/Write. Steps are highlighted below with figures.
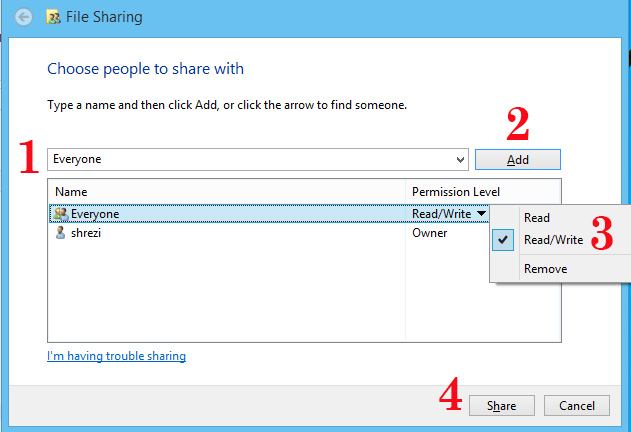
Once done, click Share and repeat the process for all of the files or folders you wish to transfer to PC 2.
Step 5: Complete Transfer
If you switch to PC 2 and go in to your Network folder, you will now see an Icon for PC 1. In the screenshot below, PC 1 should be visible next to SHREZI-PC.
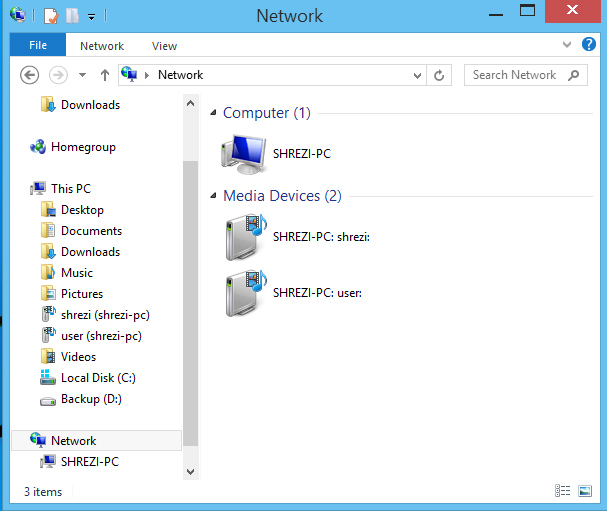
Inside will be all of the files and folders your shared in the previous step. You can now copy and paste these to a location on PC 2, for a lightning quick transfer.
Finished
That’s all you need to do to transfer files via Ethernet cable. When you’ve completed the process once, your two machines will continue to recognize each other, making future file sharing even more efficient.
With Ethernet cables you do not have to worry about the connection weakening or dropping altogether during transfers, which is often the case with wireless connections. This allows you to share lots of large files (such as Backups) with no interruption or lost data.
So, that’s that fastest way to transfer files from PC to PC.
One of alternative ways of transferring files from PC to PC
Whether you just need to send a document to another computer to print, or are transferring substantial amounts of data to a new computer, there always seems to be a million different ways to send files from one computer to another.
While many people prefer services like Dropbox or Google Drive, these depend on your internet connection and can be considerably slower than just transferring over your home or business network.
Arguably, the best way to transfer large amounts of data is directly through your local network. This means that you will not need to rely on the speed of your internet, resulting in a faster file exchange.
For a secure connection and fast data transfer, it is recommended to use an application that is dedicated to file transfer, like Softros LAN Messenger. Below are the basic steps to installing the software and transferring your files.
Step 1: Setup
To get started, make sure your computers are connected to the same network. This involves either connecting the office computers with a single Ethernet cable or a router, connecting them to the same LAN network, or the same WiFi connection.
Step 2: Installation

The next step is to install the Softros LAN Messenger application. This can be done by downloading it from their website, messenger.softros.com. The software is free to download, and should be installed on every computer you need to send or receive files from.
Once you have downloaded the software, the installer will guide you step by step to complete the setup. Now you can get ready to transfer your files!
Step 3: Sending Files
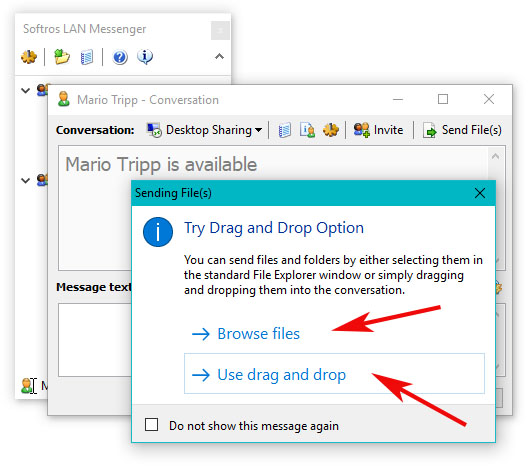
Open Softros LAN Messenger on all the computers you want to send the files to. You should see each computer user’s name inside the messenger. Simply right-click the user you wish to send the files to, and select “Send Files.”

You’ll be presented with the option to drag and drop or browse for the files, so use whichever option works best for you. Remember, you can send single files, multiple files, or even whole folders!
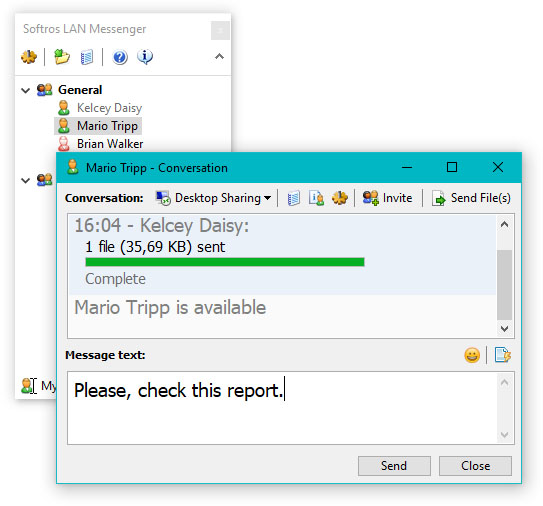
You will see a status window appear that will show you the progress of the transfer, and after the process is marked complete, you are done!
Step 4: Receiving Files
You have now sent the files and transferred them to the other computer. To find the files, open the main Softros LAN Messenger window and select “Browse Received Files.” This will let you see all the files you have sent to this machine. Once you have found your files here, congratulations! You have successfully transferred files from one PC to another.

Softros LAN Messenger is only one of many applications that allow you to transfer files locally, but it also features secure encryption and advanced features ideal for any business looking for full file sharing and messaging solution.
We hope that this tutorial helped you, and we would love for you to leave a comment about your experience with the software!


… and if you find your transfer speed clocking out at ~1MB/sec, follow these steps to get ~30MB/sec or faster:
Open Start Menu, right-click on Computer and select Properties
Under Control Panel Home located on the left side of the window click on Device Manager
You will get a list of all devices on your machine. Expand Network Adapters.
Find your Network Card and double-click on it. (Open your Network Connections window to see which card is used for your LAN.)
Select Advanced tab. You will get a list filled with different options.
Select Large Send Offload V2 (IPv4) and set the value to Disabled
Do the same for Large Send Offload V2 (IPv6) if it is available
Click OK.
Do this for both IPv4 and IPv6 on both computers.
where can i find this in win 10 ?
nevermind i found it, did increase the speed from 30mbps to like 60mbps
nothing changed in speed .. still stuck at 1 mbps
Disconnect from internet(wifi)
lol when u stop IPV4 and IPV6 it means u stooping internet IPV4=Internet Protocol Version 4 and 6; so when u finish sharing enable again it to activate again enjoy 🙂
I have Windows XP on my older computer. Most of the tips in this guide are useless for me. I am continuing to work with this guide in hopes of some success, but it’s hard when things as “Network and Sharing Center” and “Wi-Fi Properties” don’t exist on my older operating system. This is really frustrating. I’m not asking for someone to build me a moon base; I just want to transfer files without burning a million disks or swapping a USB stick a million times.
Hi Daniel,
For Windows XP, go to Control Panel > Network and Internet Connections > Network Connections.
You should see the available network including the network you joined with other computer using the ethernet cable.
Right click on LAN connection and click Properties > Advanced tab > check “Allow other network users to connect through this computer’s internet connection” option and click OK.
Again, go to General tab and you should see ‘Internet Protocol (TCP/IP)’ option.
This window is similar to ‘Wi-Fi Properties’ in Windows 7.
Now click on Option as shown in 2nd picture of step 3. Continue the guide from that step.
Let me know if it works.
Very useful, thanks, using it right now to transfer 40 GB from a desktop to a laptop.
You’re welcome!
Do I need to connect my pc to Internet?
No, you don’t need to connect to the internet. Just connect the LAN.
When i did this, the folder appeared, but some of the contents inside of it are missing on PC 2 while all of the files are present on PC 1
This is a known issue. You can try reconnecting the devices and see if it appears.
Wow, this was unbelievably easy and fast. Thank you!
You’re welcome, Michael! I’m glad to know that it helped you! 🙂
Thank you very much for all the instructions.. I’m glad that I found your Web site.. Great tutorial for noob like me.. I really appreciate all of the efforts..
Thank you so much..
I’m glad it helped you! 😉
I am trying to transfer data from an HP laptop with Vista to a desktop with win 7. I was successful in establishing networks between two PCs & also could successfully share my folders on the laptop. When I copied the folders on laptop & pasted on desktop, the transfer speed is extremely slow, less than 400 KB/Sec. Whereas, here the suggested speed is 128 Mbps. I made changes as suggested by Henry but no significant improvement. What could be the reason for so slow transfer. I am using Cat5e cable that came with my Belkin Router.
Hey Rahul,
You should re-start your computers after disabling Large Send Offload option.
I hope it works.
Cheers!
BIG TIME THANKS,IT WORKED.WOOOOOWWWW!!!!!!
My pleasure! 😉
Thanks so much for your clear, detailed instructions. Made file transfer extremely easy from W7 to W10.
You’re welcome!
You might mention for idiots like me that you’re sharing files, computer to computer. In other words, you’re not transferring files to a place on the network somewhere from C1 and then copying those files from the network to C2. The point is, if you delete one of the shared files (in a folder on the “network”) before you copy it to C2, you’re also deleting it on C1, because that’s where you’re actually copying from. Make sense?
should the above ip adress is standardized for all.?
or we can use another ip adress as we want, is it possible or not.?
thank you
You can use your own IP address, but make sure you use distinct IP addresses for each computer.
ya u can use following also
ip : 192.168.1.1
sub:255.255.255.0
default: 192.168.1.10
pc 2
ip : 192.168.1.2
sub:255.255.255.0
default: 192.168.1.10
this commonly used in cyber cafe to connect lots PC(making LAN server)
generally 192.168.1.1 <—— 1 stands for main PC
Thanks you this is great , but i am getting like 35mbps avg so is that the normal thing or should i be getting 125mbps like you mentioned in the post ?
Hey Shahmeer,
You’ll get ~125MB/s speed if you’re copying huge file like 5GB of video. It’s normal to get ~50MB/s speed if you’re copying scattered files — for example, different kind of files in a folder.
Oh ok thankyou
Great! I am extermely lucky and I all my PC 1 and PC 2 have Intel 10gb/s ethernet, I was able to transfer my files at 500mb/s !!!!! Thanks!
I’m glad it helped!
This works same as LAN network. Reaches max 11MB/sec speed.
I had all my stuff transferred from my old laptop to new one an year ago and it gave same speed on Network adapter as it is giving now through direct wire.
The other thing regarding offload, i have done that as well. It took almost 7.5 minutes to transfer a 5Gb files though.
Still helpful but would have been great to transfer 125MB/sec instead. What am I missing? I have an old laptop (core2duo) from which I am transferring to 5th Gen i5.
Hey Adeel,
You might get about 20-50 MB/s speed if you’re copying the files that are scattered (like PSD, Word, and other files in a single folder). However, if you’re copying a huge file, say 5GB, then it is the case you’ll get the speed of about 125MB/s.
I hope this helps.
It keeps asking my network credentials when I try to open PC1 from PC2 even though I’ve turned off the password. Any ideas?
Try turning on and off the option again. It should work.
set a password, if it requests a password and there is no pass set, you won’t be able to accede. Faced the same issue myself
I am trying to use this approach to backup data from my laptop to my PC. How do I assign a drive letter to the drive on my PC so that I can use a backup software on my laptop to copy data over to the PC?
There should be a default drive letter on your PC.
I have done everything told above and in comments.. but still i am getting a speed of only 10mbps.. which is extremely slow compated to others.. any solution for me?
Hi
I am in UK and my friend is in India. I am trying to transfer file of 30GB through internet. Can someone please help me the best way here
Raju
So a while back i was doing a factory reset on one of my laptops, while i let it do that it came unplugged and died. So i ended up having to reinstall the operating system but its still missing some drivers, such as the network driver. I was hoping to be able to download the missing drivers on my other laptop (pc1) and transfer them to the one missing drivers (pc2) but on pc2 on the network and sharing center under “view your active networks” it just says “you are currently not connected to a network.” That’s where the “Ethernet” but is usually but not in this case. iv’e been struggling to fix my laptop for a while now and i was really hoping this would work. any help would be appreciated.
Anup HI!
Thanks for your lesson. I have a Windows 10 PC connected via a d-link router via LAN . I am able to browse the internet. I am able to make my two PCs talk but when I need to transfer files from windows 10 to XP and visa-versa Iam getting speed of not more than 1 mbps. A 1.5 mbps file takes 10 minutes to transfer, but Tutorial ‘Here’s how to set up your Ethernet cable for super fast file sharing:’ is wonderful and the feed back which I have been reading is encouraging, unfortunately I still cannot increase my transfer speed. recently I transferred 51GB took me 1 hour and 25 minutes. What ails my connection?
Thanks for the tutorial, it does technically work, just not as advertised in my case. I don’t know why, but I’m only able to transfer at 11MB/s. I tried the changing the Large Send Offload options for both computers and rebooting, but it changed absolutely nothing for me. I am transferring about 175GB of stuff, almost all of it video. Most files are at least 1GB big, some larger, some smaller. Either way, it should be going much faster than this. I’ve tried transferring smaller files, smaller amounts at a time, pretty much everything I could think of.
This sucks, but I guess it’s better than burning a ton of CDs, or uploading and downloading a crazy amount of files online.
I did all the steps right and when i went in the network folder of pc1 the folder that i shared with pc2 appeared in pc1, i couldnt transfer my files.
yeah me too…. I can actually see the files of the PC2 on my PC1 but i can’t see the PC1 files on my PC2
Is there a way you can connect two computers like, and still have both computers connected to the internet via ethernet at the same time? Connecting in this way takes up the only available ethernet port on both computers, so how do you connect to the internet?
Asking for Network Credentials on PC1 when I try access from PC2. Tried the above suggestion of turning password protected sharing on and off again on PC1 but does not work.
I’m getting speeds between 177KB/s – 789KB/s I did everything from disabling the Large Send Offload and restarting my PCs. I’m transferring mostly audio files with a few video files, over 70GB 10,000+ files. Why is it going so slow? it’s a cat 6 patch cord(UTP) https://goo.gl/photos/GehR8b4Qx1u38Uiu7
update: I think it was going slow because both PCs are connected to the same wifi router so that’s how the files were being transferred. wow now it’s going at 10.4MB/s!
Hey Ryoko,
I’m glad you figured out the problem yourself, and good to know it’s working fine now. 🙂
Have a good luck!
Is there a way to have two computers connected directly like this, AT THE SAME TIME as having them both connected to the internet via ethernet cables to a router? It seems clunky to have to disconnect the computers from the internet every time you want to transfer files between them. But I can’t see how to have the direct connection between computers, and connection to the internet at the same time, as each of my 2 computers only has one ethernet port each. Could I install a second network card in each computer, for example, and use that for transfers between the computers, while keeping the original network cards for the internet connection? If this is possible, would it be complicated to set up?
Chris,
I have kept my Wi-Fi on and try transferring the data via cables, it was transferring the data via Wi-Fi which is really very slow as you know.
After a lot of frustration I discovered what was the problem. My network adapters are only able to transfer at 100Mb\s. A cat5e cable is not enough! You may want to put that info in your article.
Thank-you very much
Hello. My error message says ” Windows cannot access \\ GREG-PC
Check the spelling. Otherwise there might be a problem with your network.”
same. have you figured anything out??
There should be no space between “\\” and your PC username.
I am still only getting 11 MB/s. Followed all the settings described above and restarted both computers. Initially I only disabled IPV4 and then tried it for 6 as well and no change. Any ideas?
thank you very much bro saved a lot of time for me
Hi,
I don’t see PC 1 from PC 2 but do see PC2 from PC1. I have checked and rechecked the above process. What could be the reason?
I have successfully established the connection between 2 computers, but connection is speed is relatively slow (maximum speed about 3MB/s). I have disabled the Large Send Offload V2 (IPv4) and Large Send Offload V2 (IPv6) options on one computer, but there are no such option on another computer, both computer have Gigabit Ethernet interface. Are there any other option may affect connection speed in my circumstance?
Hey Lewis,
Are both computers running on the same same windows version? I recommend the following:
Make sure you use only one connection type (IPv4 recommended). Uncheck IPv6 on both computers and apply the settings.
1) Disable RDC (Remote Differential Compression)
Go to Control Panel -> Programs
Under Programs and Features, click on ‘Turn Windows features on or off’ -> Uncheck “Remove Differential Compression” and Apply the change.
2) Clear DNS cache
Run CMD as administrator and type ‘ipconfig /flushdns’ (without quotes)
3) Disable autotuning
Open CMD as administrator and type ‘Netsh interface tcp set global autotuning=disabled’ (without quotes). NOTE: The path should be as C:\Windows\System32>
So the overrall input looks like this: C:\Windows\System32>Netsh interface tcp set global autotuning=disabled
Now the auto-tuning should be disabled. To see if it’s actually disabled type: Netsh interface tcp show global
If the above doesn’t work, disable the rss as well by typing: Netsh interface tcp set global rss=disabled
Let me know if any of the above solution worked for you. It would help the rest of the people. 🙂
Thank you!
Hi! My Father recently brought me our old family Computer
Its a Pentium 3 with 256 MB of Ram and Windows XP in a 60GB HDD (The HDD is Broken and Somewhat it Worked in this Moment but with Clicks), I Wonder how can i do this and Transfer it to our New PC (Core i5, GeForce980, 8GB Ram)
With Windows 10 Pro
Windows XP has some limitations for this transfer method. If it’s only 60GB, I recommend using external hard-drive or a flash drive to transfer files.
Hi . I followed all the steps but I am still stuck at 11 Mbps . Please. Help me out I am transferring files from shared folder to other PC
I am trying to transfer music from one laptop to the other and when I go to click on PC1 to try and save the files onto PC2 it opens with Media Player and gives an error message “Before you can play items in this library, you must first be allowed to access the library.” So I still can’t access anything I transferred over. Please help!
Hello
Thanks for best and explain post about fast file transfer
I am getting 100MB/S speef with changing the IP address DNS server and Subnet Mask
however I want to know if I make the changes as suggested by trailing post listed here will the speed get further improve
Or not?
when the files are transferred do I go back and turn the wifi back on in the control panel?
Yes, if you don’t need to do any more file transfers.
Great! I am extermely lucky and I all my PC 1 and PC 2 are connected successfully but on pc 2 after clicking on users folder i can’t see the public folders , I was able to transfer or paste files !!!!! Thanks!
Hey! when i get to Step 4 “Share with” my only option is advanced sharing, how do i then proceed to share between the pc’s ?
My mother and I are switching computers due to her having better one she barely uses. We both want to keep all of our files. Any way in particular I should go about switching our files around without deleting any of them?
If there are too many files, I recommend getting an external hard drive and use it to transfer files.
Thanks for this! Still need to try it. Is it possible for PC1 or PC2 to still connect via wifi and have internet connections? Just thought I’d as before diving into all of this.
Thanks,
I suppose not. Try it and let us know if it’s possible. 🙂
and one more thing it is showing limited ethernet in network status
Note that this can be accomplished without a cross-over cable if you have switched ports on the back of your internet/wi-fi router.
Most modern wi-fi routers (the device you connect to your cable modem to give your home wi-fi access to the internet) have 4-5 gigE ports on the back to plug devices into. It isn’t uncommon for these wi-fi routers to also do your DCHP (IP address assignment), DNS (address to name translation) and security.
If you have one of these, simply plug both computers in with network cables. They’ll get their IP addresses automatically and should be able to see each other on the same LAN. Then, you can skip some of the steps above that relate to setting up the IP addresses, default gateway, etc. and just need to allow other devices on the same (trusted) network access/permissions to share files.
For people who are transferring lots of little files, and therefore can’t get the higher transfer rate, if the amount of data is very large, consider archiving it, and then sending the archive as one big file. This is three big steps instead of one giant step, so your mileage may vary.
I am needing to transfer ~800GB from one laptop to another so I’m concerned that this will count guard ATT’s stupid data cap. I’d love to do it this way but if it’s going to count toward my data cap I’m better doing it the old fashioned way.
Thanks in advance.
No internet connection is required for this. Just turn the Wi-Fi off in both computers.
pc1 is shown in pc2, but pc2 is not shown in pc1
Make sure you’re disconnect from Wi-Fi in both computers.
everytime i try to open it up in network it says something like “make sure the spelling is right if so check your network” ive tried everything please help
Thanks I went from 3 MB/s via WIFI to 60 MB/s with your help, but it is possibe to achieve 125 mb/s???
If you’re transferring a huge file like HD movie, then it’s possible. Try it.
Hi guys !! First of all, thank you for that information. I have managed to establish a connection between my 2 laptops and now i am transfering files without any issues. But still i am reaching only 10 mb/sec speed…. My main laptop is windows 10 and my other is on windows 7 service pack 1. I have disabled the Large Send Offload’s on both computers. You must know that i had 2 V2 options for it on my windows 10, and 3 options my Windows 7 ( V2, and one other without version, i guess Version 1 ) Anyway i disabled all of them and i am still stuck at that low downloading speed. I am transfering folders with music in it ( 2 gbs + size). Can you help me figure it out ?
I have now connected my two computers via Ethernet with crossover cable 4 times now.
Each time I switch to PC 2 and go in to my Network folder, I do not see an Icon for PC 1. next to SHREZI-PC.
Have checked and double checked the instructions.
But to no avail.
Internet connection drops out.
What am I doing wrong.
Norm
Hey Norm,
May be you’re not connected to PC 1 correctly. Did you try unplugging and plugging back again? Also, internet connection is not required for this process.
This worked great for me. It transferred at around 11 mbs and kept everything in the correct folders for me. Thanks for the info!
many thanks from 2 MBPS using wireless to almost 100 MBPS using this method….
Thanks so much.!
Increased my LAN speed from 2MB/sec to 100MB/sec
Turned off security – but still get windows password required
I haven’t tried this method yet but I want to ask first this question, after entering those ip addresses manually on the computers to perform this file transfer, what am I supposed to do after I’m done with this process? I mean with regard to those ip addresses that I have manually entered? Do I need to change it back to automatic since I’m going to connect my pc again to my router. Or will it go back to automatic settings on its own?
Hey,
I did establish the connection between PC1 and PC2, but it still asks me for the password when I try to access the shared files even though I’ve disabled password protection. How can I fix that or how can I at least set a password ?
Thanks.